Dynamic Mosaic -
Help Dynamic Mosaic -
Help |
Dynamic Mosaic -
Help
Tweaking the dynamic show
This chapter explains how to tweak a
dynamics show It is assumed that the source files
and
the commercial files are already selected and are available in their respective folders. It is
also assumed that the picture library is available and has sufficient
pictures. In this tutorial we use the pre-installed library (with small tiles: just 120x120 pixels
each picture).
Step 1:
Prepare for the dynamics.
Follow the 5 steps as explained in the chapter 'My first dynamic
show'. We start from here.
We assume
you are using a photo booth or a tethered camera, attached to a hard drive
to store the snapshots from the camera. The default folder is as installed:
'C:\Users\Public\Documents\APP\Dynamic
Mosaic\BoothPics'. We assume that this is the correct folder. You now
have to also set this folder location in the photo booth software, or the
tethered camera interface. With e.g. Canon, Nikon and Olympus special
applications need to be started and running to allow for tethered shooting. In
some cases these software can run on the same system, or on a different system.
When on different systems you need to use a common external hard
drive. It's up to the technician to make the folder locations make fit. You need
to test to check if the picture actually arrive in the designated folder. At the
moment we have not tested if a server drive can be used for polling for the
snapshots.
Step 2b: Activate
the web cam In case you don't use a photo booth
or tethered camera you need to use the embedded web cam function to make
snapshots and feed these to the mosaic. Open the 'Camera' tab. Check if a camera is already available, e.g. the
built-in laptop camera. If you want to use a different external web cam you
need to plug this in and restart the Dynamic Mosaic application. The application
can only detect a web cam at start, and not after having plugged in a
new camera while running. If the camera has been selected, now also select the
video size. Make sure the size is modest, e.g. between 640 and 1024 pixels. The
best rule of thumb is 50% of the monitor size will result in acceptable
quality pictures. Activate the camera. In case
you want to flip the signal (mirror effect), activate this option. Also set the
desired snapshot frequency. When the 'Snapshot'
option is not active the camera has no function, and could as well be turned off
again. If you want you can test the snapshot function: Step 3: Select the sources
In case you wish to only
restrict the source files for the mosaics, you need to open the 'Sources' tab,
and uncheck every source picture that should not be sued in the show. With
installation comes also several source picture aspect ratios (4:3 and 16:9). You
need to also check if the aspect ratio of each selected source file corresponds
with the external monitor size. Deselect any source file that does not have the
correct aspect ratio. In some cases you need to prepare the source files by
resizing them to match with the aspect ratio of your external monitor (e.g.
1650 x 1050) or 825 x 525 in pixels size. There is no need to exactly follow the
monitor sizes, as long as the aspect ratio of the source picture is
correct. The same should be done for
the commercial pictures and video. Video is not easy to simply resize to the
correct aspect ratio. In that case make sure the background colour is e.g. black
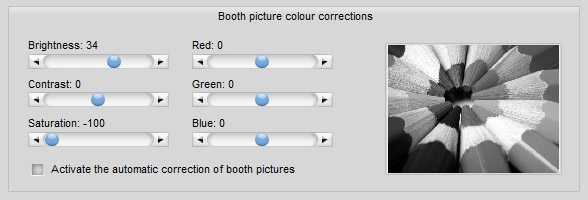
or white to fill the spaces of the screen. This can be set in the 'Mosaic settings' window. Step 4: Manage the colours Each
snapshot picture from an external source (booth, web
cam, tethered cam) can be filtered to better fit with the colour requirements
of the mosaic. First open the 'Colours' tab in the 'Admin' tab. Make
sure you have an example of a snapshot available on your hard drive. Double-click on
the miniature picture and navigate to such an example picture. Then tweak
the colours and brightness, saturation and contrast to your liking. Please remember
that the filtering is done in steps: first the BCS steps, then the
RGB corrections. In some cases the colour is appearing again, even if you
have set the saturation to gray scale. This is because the saturation is not
entirely 100% set to gray scale. Some colour is still left. The example below
shows a filtering to make all pictures gray scale with a slight increase of
the brightness, e.g. to allow to be used in black
and white source pictures. Step 5:
Save your settings as a project When all is set and done you
can now save your settings in a project file. This is then useful to restart
after closing the application with exactly the same settings. Opening the
project will however not activate the camera, and also not keep the choice
of web cam in case multiple cams were used when saving the project. You
need to remember this yourself. To save the project, use the
menu 'Project' 'Save project' and follow the
instructions. All projects are stored in one common location. You cannot select
the location of the project file yourself. This location is: 'C:\Users\Public\Documents\APP\Dynamic
Mosaic\Projects'.
Choose a low value
of the snapshot frequency; e.g. every 1 minute (a value of 60
means: every 60 seconds).
Activate the dynamics
(press the 'Start Dynamics' button) and make the
viewer tab active (or watch the already detached viewer on your second
monitor).
You should now see a
snapshot flying in (after 1 minute of patience). If so, set the correct value
of the frequency of snapshot taking, and stop the
dynamics.